
Wednesday 3:20 AM
| Public Links |
|---|
| - CenTex NWS Alerts |
| Synapse Misfires |
|---|
| - Eww, That Smell |
| - Here Ya Go! |
| - Texas Weather |
| - Takes a Village |
| - It Was Vewy Quiet |
| - TPWD Geocaching |
| Not Logged In |
| Originals |
|---|
| - On Photography |
| Not Logged In |
| Topical Collections - My Online Memory |
|---|
| - HippoFan Geocaching |
| - Home Automation |
| - 3D Printing |
| - Build Your Own Server |
| - Amateur Radio |
| - Daily Compute |
| - Recreational Vehicles |
| - Drones |
| - Live Streaming |
| - Smokers |
| - Woodworking |
| Not Logged In |
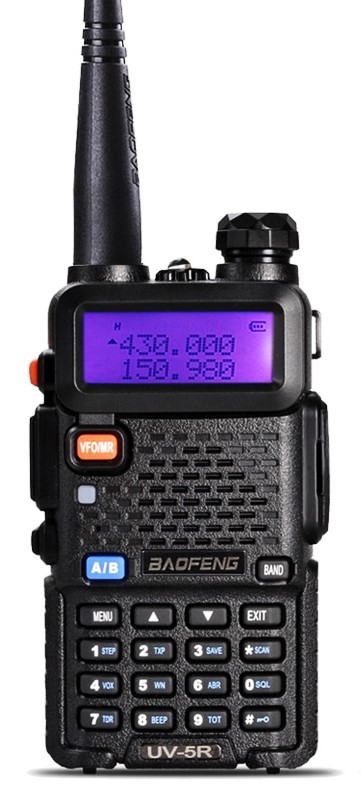
[Kit 1] has a radio, 2 basic batteries, 12V adapter, AC adapter, antenna, VOX, programming cable, charging base, lanyard, belt clip, and a small CD with some software and drivers that I haven't used.
[Kit 2] shipped with a radio, 3800mAH battery, A/C adapter, antenna, VOX, charging base, lanyard and belt clip. Many sources offfer a multitude of different kits, I wanted both AC and DC charging capability and wanted to evaluate the convenience of a small battery versus the capacity of a large battery.
I may add my own commentary in italics
If the voice is not in english, press the Menu button once, then '1', then '4'. This puts you into the Voice Prompt menu. The arrow should be on the first row of the radio display which reads VOICE. Press [MENU] again to move the arrow to the bottom row. Then use the Up and Down arrows to select English, Chinese or Off. Press [MENU] again to preserve the selection, then [EXIT] to leave the menu.
Now when you turn the radio on it will speak to you in your desired language, as long as you desire English or Chinese.All of the menus work the same way, press [MENU], then the desired menu number via the keypad (or walk through them using the up and down arrows), then [MENU] again to get into the specific values for the selected menu, up/down to select the desired value, [MENU] to save the value, followed by [EXIT] to leave the menu.
By the way, the radio's language defaults to Chinese. If you ever reset the radio to all the default values (Menu 40 RESET => ALL), it will revert to Chinese.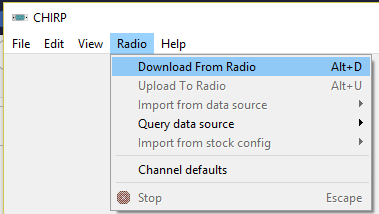
You've got Chirp installed and the cable configured, so let's read all of the factory settings into chirp and make a backup copy.
Attach the programming cable to your computer and call up Chirp.
Attach the programming cable to the radio.
In Chirp, click on the top line where the menu says Radio. This will offer you several options, the one we want right now is to
Download from the Radio
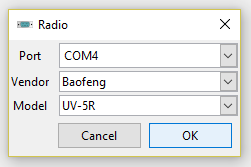
There will be another Radio Select box allowing you to select the COM port and radio type, etc, make the selections and continue.
After the LED blinking stops and the radio resets, Chirp will display all of the information it found on the radio
Before anything else, save this *.img file to preserve the factory settings. I used the filename "Radio_UV-5R_sn552_DEFAULT.img" to note that it originated with the radio whose serial number ended in 552.
I also immediately saved the same file as "Radio_UV-5R_sn552_20181205_CUSTOM1.img" as I started to experiment. That is my feeble attempt at change management, naming by date and some kind of version identifier.
This "CUSTOM1" file will become the baseline image for all of my radios, with the version added to the end up to 7 total characters in the string.
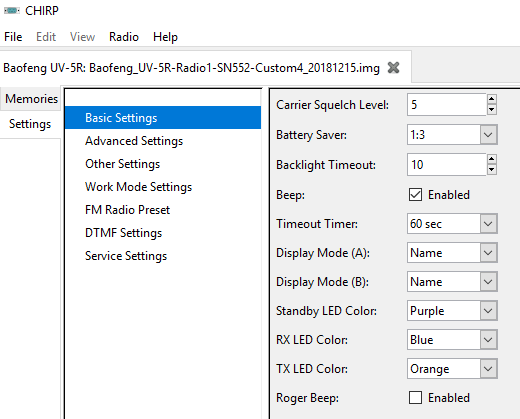
The left column in Chirp has a Memories tab and a Settings tab. Let's start with the Settings. Our immediate goal will be to add the "CUSTOM1" to the power-on display so we know which programmed load we're using on the radio.
From Chirp's Settings tab, look at the Basic Settings. Most of these I leave alone, but I do want both radio display lines to show the Channel Name when it is known. Frequencies are much harder to remember. So the entries for Display Mode (A) and (B) are set to Name. If you want, you can change the LED backlight colors when transmitting or receiving. Once I get comfortable with the radio I will disable the Beep, and most people recommend setting/leaving the Roger Beep off.
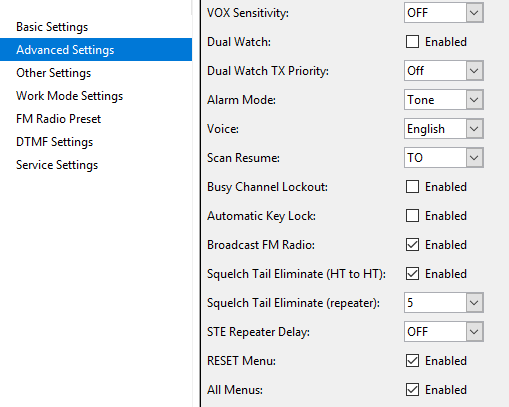
In the Advanced Settings tab we'll find the all-important Voice setting. I prefer English so I have a chance of understanding.
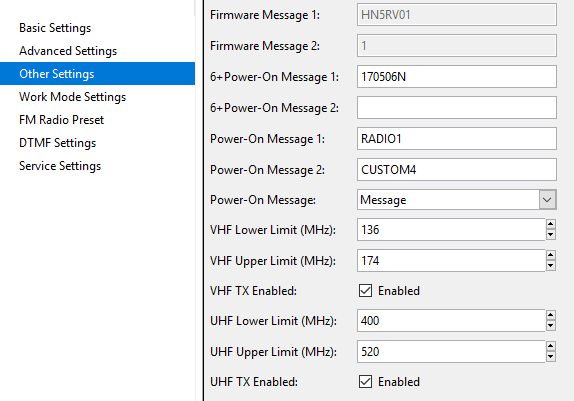
In the Other Settings tab we find the labeling information that will let you know which program you are using just by turning the radio on. Make sure you set the Power-On Message field to "Message" to show Power-On Message 1 and Power-On Message 2. Once I pass the technician exam I will change Message-1 to my new callsign to prevent confusion down the road. If there's room I'll add a radio number to the end, or it might get merged into Message-2.
All the other settings are good to go for now unless you really want to change the FM Frequency default on the FM Radio Preset tab.
Go to File => Save and save the image. We'll build on that right away.It would be good to go ahead and save that to the radio, so pull down Radio => Upload To Radio and let it fly.
| Official Name | Frequency | Marine Channel | Public Alert Channel |
|---|---|---|---|
| WX1 | 162.550 | 39B | 7 |
| WX2 | 162.400 | 36B | 1 |
| WX3 | 162.475 | 97B | 4 |
| WX4 | 162.425 | 96B | 2 |
| WX5 | 162.450 | 37B | 3 |
| WX6 | 162.500 | 38B | 5 |
| WX7 | 162.525 | 98B | 6 |
The radio needs to be in frequency mode to directly enter frequencies. Press the [VFO/MR] button to toggle between channel mode and frequency mode until you're in frequency mode. At this point you can directly enter a frequency.
For WX1, enter the numbers 162550 directly from the keypad. No enter or exit is required. If NOAA is broacasting on WX1 you should see the LED backlight change color and you'll hear the signal. If nothing happens, enter subsequent WX channels from the table.When you find an active WX station save it into a memory location. Press [MENU], '2', '7', [MENU], (then use the up or down arrows to select memory location 2), [MENU] (to save the value into MEM-02), and finally [EXIT] (to get out of the menu). Now this frequency will appear in your channel list.
Now add a second frequency by pressing the [A/B] button to modify the other display line frequency and typing another NOAA WX frequency on the keypad. Save it to MEM-03Both will remain active and you can switch between them using the [A/B] button.
If you return the radio to channel mode [VFO/MR] you can step up or down through (both) channels using the up and down arrows, and they will remain available until cleared or overwritten.Even better, if you perform the "Download from the Radio" operation in Chirp you'll see these two channels in Memory locations 2 and 3!
| Privacy Code | Freq (Hz) |
Privacy Code | Freq (Hz) |
Privacy Code | Freq (Hz) |
|---|---|---|---|---|---|
| 1: | 67.0 | 14: | 107.2 | 27: | 167.9 |
| 2: | 71.9 | 15: | 110.9 | 28: | 173.8 |
| 3: | 74.4 | 16: | 114.8 | 29: | 179.9 |
| 4: | 77.0 | 17: | 118.8 | 30: | 186.2 |
| 5: | 79.7 | 18: | 123.0 | 31: | 192.8 |
| 6: | 82.5 | 19: | 127.3 | 32: | 203.5 |
| 7: | 85.4 | 20: | 131.8 | 33: | 210.7 |
| 8: | 88.5 | 21: | 136.5 | 34: | 218.1 |
| 9: | 91.5 | 22: | 141.3 | 35: | 225.7 |
| 10: | 94.8 | 23: | 146.2 | 36: | 233.7 |
| 11: | 97.4 | 24: | 151.4 | 37: | 241.8 |
| 12: | 100.0 | 25: | 156.7 | 38: | 250.3 |
| 13: | 103.5 | 26: | 162.2 | (none) | (none) |
An FRS radio applied a "Privacy Code" by adding a specific (standardized) low frequency tone to the outgoing signal. A receiver listening to the same channel would only let you hear the "private" transmission if it detected the low frequency tone it expected. When working properly it seemed like a private conversation because the receiving radio simply ignored everything else.
That's why sometimes User-A could hear User-B, but User-B couldn't hear User-A. User-B used a privacy code and could only hear matching transmissions. User-A received everything because the privacy code was not set, and since the privacy code was not set it did not include the low frequency tone expected by User-B's radio, so User-B's radio ignored User-A's transmissions.
In the amateur radio world those "privacy codes" are called CTCSS, or the Continuous Tone Coded Squelch System
Semi-private, point-to-point networks can use this technology just like a grown-up version of FRS.
On the UV-5R, Receive-CTCSS is set in menu 11, Transmit-CTCSS is menu 13. The radio can be manually programmed, with each setting for a channel defined through the menu system, than saving the values into a memory location. That is how to do it in the field, but if a computer is available all of this can be done easier using Chirp. With backup copies. And internet resources.
NOTE: DO NOT USE THE UV-5R TO BROADCAST ON ANY FRS/GMRS/MURS FREQUENCY. This table is only presented as an example of how the CTCSS/PL work in a familiar platform. It is illegal to broadcast on FRS/GMRS/MURS frequencies using an amateur radio. Link
[(none)]: the frequencies are the same;
[off] means transmissions on this channel are disabled (ie NOAA Weather channels);
[split]: The offset column will contain the absolute transmit frequency to use for this repeater;
[+]: the Offset column value will automatically be added to the Frequency column value when transmitting;
[-]: the Offset column value will automatically be subtracted from the Frequency column value when transmitting.
See What is a repeater and how/why do I use it below.
Very descriptive UV-5R Menu Descriptions from miklor.com
How do I use the UV-5R as a scanner?
Turn your Baofeng UV-5R into a Police Scanner!
Boafeng UV-5R Accessories That YOU Need!
BTECH, BaoFeng BL-5 AA Battery Pack for for BF-F8HP, UV-5X3, and UV-5R Radios
ExpertPower Baofeng UV-5R Extended True Capacity Battery (Model: BL-5L, 3800 mAh, Black) DM-5R
Miklor: Everything about the Baofeng UV-5R Series, UV5R / BFF8 / GT3 and all variants of the UV5R
Manually-Programming-BaoFeng-HT-Radio-Channels
===>>> Baofeng For Dummies UV5R+ HAM Radio Tutorial <<<===
Baofeng UV 5R How To Manually Program Repeaters. Repeater Book 5 on iPhone App??
Baofeng UV-8HX Emergency set up
HAM Radio Crash Course - Baofeng UV5R Family Radio Programming and Settings Part 1
BaoFeng BF-F8HP (UV-5R 3rd Gen) 8-Watt Dual Band Two-Way Radio (136-174Mhz VHF & 400-520Mhz UHF) Includes Full Kit
Baofeng For Dummies UV5R+ HAM Radio Tutorial
[Kit 1] has a radio, 2 basic batteries, 12V adapter, AC adapter, antenna, VOX, programming cable, charging base, lanyard, bet clip, and a small CD with some software and drivers that I haven't used.
[Kit 2] shipped with a radio, 3800mAH battery, A/C adapter, antenna, VOX, charging base, lanyard and belt clip.
I wanted both AC and DC charging capability and wanted to try out both the convenience of a small battery and the capacity of a large battery.
|
"Patriotism is as much a virtue as justice, and is as necessary for the support of societies as natural affection is for the support of families." - Benjamin Rush |
| Geek Humor |
|---|
| If you're not part of the solution, you're part of the precipitate. |
| Regular Reading |
|---|
| Blogs and RSS Feeds |
| Special Archives |
| People of The Son |
| People of the Gun |
| Groups of the Gun |
| People of the Hack |
| Legal Eagles |
| Mine, all Mine |
An exercise in truly free free-speech. No license required, no training wheels available.
"When words lose their meaning, people will lose their liberty." -- Confucius
vincit omnia veritas